Man, was I screwed. I had this awesome laptop with a diy keyboard backlight and then it died on me just after the (already voided) warranty had expired and new mainboards were ~200€…
It all started when I noticed that my ATI Radeon 5650M GPU had vanished in Windows, so I tried to reboot, enter the BIOS and set the GPU to “discrete”. After that my 3820TG didn’t even start and I got a black screen and one long and two short beeps, no BIOS, no POST, no NOTHING. I wasn’t sure what was wrong… Some research on the internet showed me that the problem could have two possible reasons: Either the GPU was “defective” (usually the solder joints are bad and need reflow / reballing) or the BIOS chip (W25Q32BV) was defective.
My first idea was to reset the GPU setting to “switchable” by resetting the BIOS, so the IGP would be used and I could at least boot. What I tried:
- Removing battery and power supply and holding the power button for ~1 minute to reset the EC – No change.
- Blindly entering the BIOS with “F2”, then pressing “F9” + “Enter” and then “F10” + “Enter” to load default values – Didn’t work, the laptop still beeps and doesn’t seem to enter the BIOS.
- Creating a crisis disk on 2 different USB sticks and applying it with “Fn”+”ESC”. The laptop didn’t beep, but as I couldn’t see anything, I didn’t know what happened…
- Creating a bootable USB stick and an automated batch to re-flash the BIOS – Laptop didn’t even boot the stick.
- Resetting the CMOS by bridging the switch close to the BIOS chip and starting the laptop. Several times – No change.
- Removing the CMOS battery for a day to clear the CMOS – No change.
I decided to shell out for a new processor. I had a i5 480M in the laptop and didn’t know if it was broken and maybe couldn’t start up with the broken IGP. I ordered a i5 520M on Ebay and installed it, but the problem stayed the same… At that point I felt pretty beat, because I knew there would be some hard(ware) work involved to get the laptop back to life.
The next try was to read out and re-flash the BIOS chip (it is below the keyboard in the lower right corner) using a programmer from outside. Flashrom is perfect for this, and I tried using an Arduino Pro and an Arduino Leonardo with it, which is what I had lying around. The Arduinos have an SPI bus, but I had to build a level-conversion circuit from 5V to 3,3V of the chip. I slapped something similar together with a different CMOS chip I had, which should have worked ok, but it didn’t.
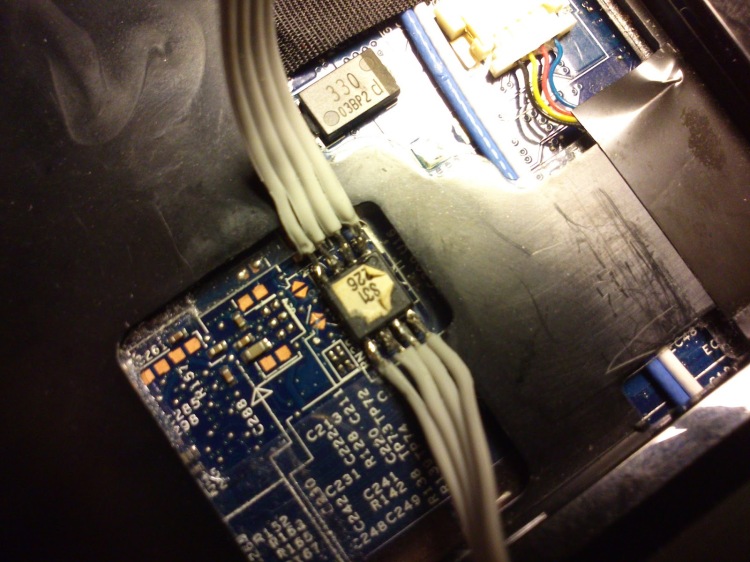

At first I though the problem was that I had tried to read the chip “in system”, so I unsoldered the BIOS chip from the mainboard and connected it directly to the level converter and both Arduino – No dice. I ordered the exact same CMOS chip decribed in the schematic on the flashrom page – No dice.
I was sure I was doing something wrong, but it would take another three weeks to find the problem…

My next (deemed final) try was to reflow the GPU chip. I was a bit afraid to try it, because I figured I could finally break the whole board. I used a heat gun, covered the board with some aluminium foil, leaving only the GPU uncovered. The I first warmed up the board with the heat gun for a minute, moving it in circles, then directed the heat gun straight at the GPU for another minute or so. After letting the thing alone to cool for some ten minutes I tried the board. It didn’t work…
I was desperate. What now?! Finally I deciced that it must be the BIOS chip and gave it one last try after finding out that the Raspberry Pi could read the chip directly via SPI. The RPI has 3,3V and thus no level converter is needed. I soldered some wires to the chip an tried to read it, but Flashrom wouldn’t detect the chip. At that point I was pretty sure the BIOS chip was b0rked…
So. Buy a new BIOS chip, eh. But where?! 5 chips are only 5€, but Ebay showed me only sellers in China, no german store was carrying the chip… I bit the bullet.
Fast forward three weeks and I had an envelope in my post box with W25Q32BV chips. I connected one to the RPI and, voila, it worked!!! Some flashing, soldering and a handful of screws later I tried to turn on the laptop and it booted! Yesss!
After the Laptop had booted I created a bootable USB stick and used that to flash a modded 1.19 BIOS version that lets you adjust a lot more BIOS settings than the stock 1.19 version. You can fix the graphics card to IGP with it, effectively turning off the 5650M GPU.
I hope this helps someone to revive their laptop. Don’t give up too soon… 😉

bro, how do you clear cmos ? short the up and down arrow together or ?
LikeLike
Yes.
LikeLike