I had this Medion Lifetab P8314(.2) tablet and kernel sources from the vendor and wanted to compile Android x86 5.1.1 64Bit for it. Compiling Android x86 is described in detail here, but there are some caveats, so I’ll noodle it all down here from the beginning. Note that I use Ubuntu 16.04.03 as a host system.
Setting up the virtual machine
- Create a virtual machine e.g. using VirtualBox. Give the machine at least two of your available CPU cores and >= 8GB RAM. Make sure the VM disk has at least 100GB of free space and you have a swap partition the size of your VMs RAM.
- Install Ubuntu 16.04.03 into the VM and update it.
- Optional: To make interaction with the VM easier (cut-paste and stuff), set up port forwarding into the VM via SSH (image in german, but you’ll get the idea):


Then “sudo apt install openssh-server” in your VM, make it start up on VM startup: “sudo update-rc.d ssh defaults” and reboot the VM. You can then ssh into the VM via a terminal on your host: “ssh -p 3022 @127.0.0.1”.
- Optional: To exchange files to / from your VM, activate a shared folder (image in german, but you’ll get the idea):
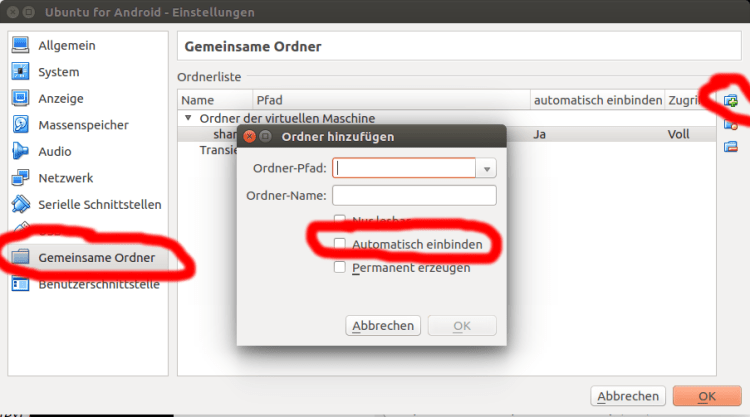
Later make sure your user can write the folder: Run “sudo usermod -aG vboxsf ” in your VM.
Set up the build environment
- Read and follow: Set up a build environment and install all needed packages.
- Install some extra packages: “sudo apt install gettext bc python-pip mtools genisoimage syslinux-utils android-tools-fsutils“.
- Install the python package “mako” with “pip install mako”.
- Install the OpenJDK for the Android version you need:
- Android 5 and 6 need OpenJDK 1.7 (Java 7). This does not have a PPA in Ubuntu 16.04, so add one: “sudo add-apt-repository ppa:openjdk-r/ppa”. Install the JDK using “sudo apt install openjdk-7-jdk”.
- For Android 7 and 8 you need OpenJDK 1.8 (Java 8).
- Make sure the proper SDK is used: Run “sudo update-alternatives –config java” and select the correct version (if there are different versions afterall).
- Now follow this to download the sources.
Build Android-x86
- Enter directory: “cd android-x86”.
- Set up the build: “. build/envsetup.sh”.
- Select a target: “lunch android_x86_64-userdebug”. You can find an explanation about the different target types here.
- Start build with: “m -jX iso_img”. For X use about twice the number of cores your VM has. You can use “iso_img” to build a CDROM / bootable iso or “efi_img” to build an EFI image for smartphones and tablets. Use “bootimage” to create the boot.img and “kernel” to create the kernel only.
- To convert images, specifically the generated “system.img” to a sparse image, run “img2simg “.
Fixing compile errors
- Error “sigchain_dummy.o: unsupported reloc 43 against global symbol std::cout”: See here.
- Error in “build/core/tasks/kernel.mk:85: recipe for target ‘kernel/drivers/net/wireless/wl/Makefile’ failed”: This was a wtf problem. Run “cd kernel/drivers/net/wireless/wl/ && wget https://docs.broadcom.com/docs-and-downloads/docs/linux_sta/hybrid-v35_64-nodebug-pcoem-6_30_223_271.tar.gz && wget https://docs.broadcom.com/docs-and-downloads/docs/linux_sta/hybrid-v35_64-nodebug-pcoem-6_30_223_271.tar.gz”. Then edit “kernel/drivers/net/wireless/wl/build.mk and comment the “curl” line.
- Errors in EGL driver regarding sync.h not being found: Edit “external/mesa/src/egl/Android.mk” and add “system/core/libsync/include” to LOCAL_C_INCLUDES. See here.
- Error “error: ‘SE_SBLABELSUPP’ undeclared” in “kernel/security/selinux/hooks.c”. See this.
Creating a bootable USB stick
- To make the .iso bootable on and USB stick, run “isohybrid <PATH_TO_ISO>” on the iso. See here.
- To copy the iso to the USB stick, run “df” and note the devices, then insert the stick, run “df” again and note the device path of the attached stick (e.g. “/dev/sde”). Make sure it is correct, because otherwise you can destroy your system disk or any other attached disks! When you are sure you have the correct path, run “sudo dd if=<PATH_TO_ISO> of=<USB_DEVICE> bs=4M status=progress && sync” and wait a bit. Then safely remove the stick.
